How to Use Terraform Force-Unlock to Manage State File Locks
Terraform state file helps you keep track of all the resources that Terraform manages within your infrastructure. To ensure that only one team member makes the change to the same state file, you need to set up state locking by configuring a remote backend, such as AWS S3, for storing the state file and DynamoDB for state locking. Now, if a team member performs the apply operation that fails or is interrupted, the remote state file may remain locked, preventing any further changes to the infrastructure. In such cases, the terraform force-unlock command is used to unlock the Terraform remote state file.
In this blog, we'll cover what the terraform force-unlock command is, when to use it, understand it with an example of unlocking a terraform state file stored in the remote backend, and will also provide the best practices you should use to manage your state files and file locks.
Understanding Terraform’s Locking Mechanism
Terraform’s locking mechanism creates a temporary lock on the state file stored in the remote backend whenever a write operation is performed on the infrastructure configuration. When the state file is locked, you cannot run the apply or destroy commands until the current operation is completed.
The remote backend manages Terraform’s state lock, which makes it highly reliable in cloud environments like AWS S3, Google Cloud Storage (GCS), or Azure Blob Storage. The lock is created when a Terraform action, such as terraform apply or terraform destroy, starts and is automatically released once the action completes. If someone on your team deploys any changes while the state is locked, Terraform will block this change. This makes sure that no one else can make changes at the same time, avoiding any conflicts in the infrastructure.
Why State Locking is Important?
State locking allows only one Terraform process, such as terraform apply or terraform destroy, to modify the infrastructure at a time. Let's take a look at how state locking helps DevOps engineers:
- Avoids Duplicate Resource Deployment: Without state locking, multiple team members might try to deploy and create duplicate resources, such as trying to create the same EC2 instance at the same time, which could lead to conflicts, and misconfigurations.
- Ensures Sequential Deployments via Pipeline: In an automated pipeline, multiple jobs might trigger Terraform operations at the same time. For example, two pull requests can make changes to the same infrastructure at once, which causes two apply operations in Terraform to run at the same time. State locking makes sure that these operations are done one after the other, preventing them from interfering with each other.
- Minimizes Risk of Deployment Failures: By allowing only one task, such as running
terraform applyorterraform destroy, to happen simultaneously, state locking helps avoid failed deployments due to overlapping changes or interruptions. For example, if one person is updating a security group while another is creating an EC2 instance at the same time, without locking, both changes could interfere with each other and cause problems. State locking ensures that changes happen one at a time, preventing these issues.
When Should You Use the Force Unlock Command?
The terraform force-unlock command is used when a state file remains locked due to an interrupted operation. Terraform automatically locks the state file during operations, such as apply, and unlocks it once the operation is completed. However, the state file remains locked if the process is interrupted due to network issue, or timeout.
In the case of a remote backend, such as S3 with DynamoDB, if the state remains locked after an interruption, you need to use the terraform force-unlock command to manually release the lock and continue making changes to your infrastructure.
Where to Find the Lock ID?
The force-unlock command requires a Lock ID, which is a unique identifier assigned to the lock. If a Terraform operation such as apply fails with a state lock error message, you can find the Lock ID in the error output.
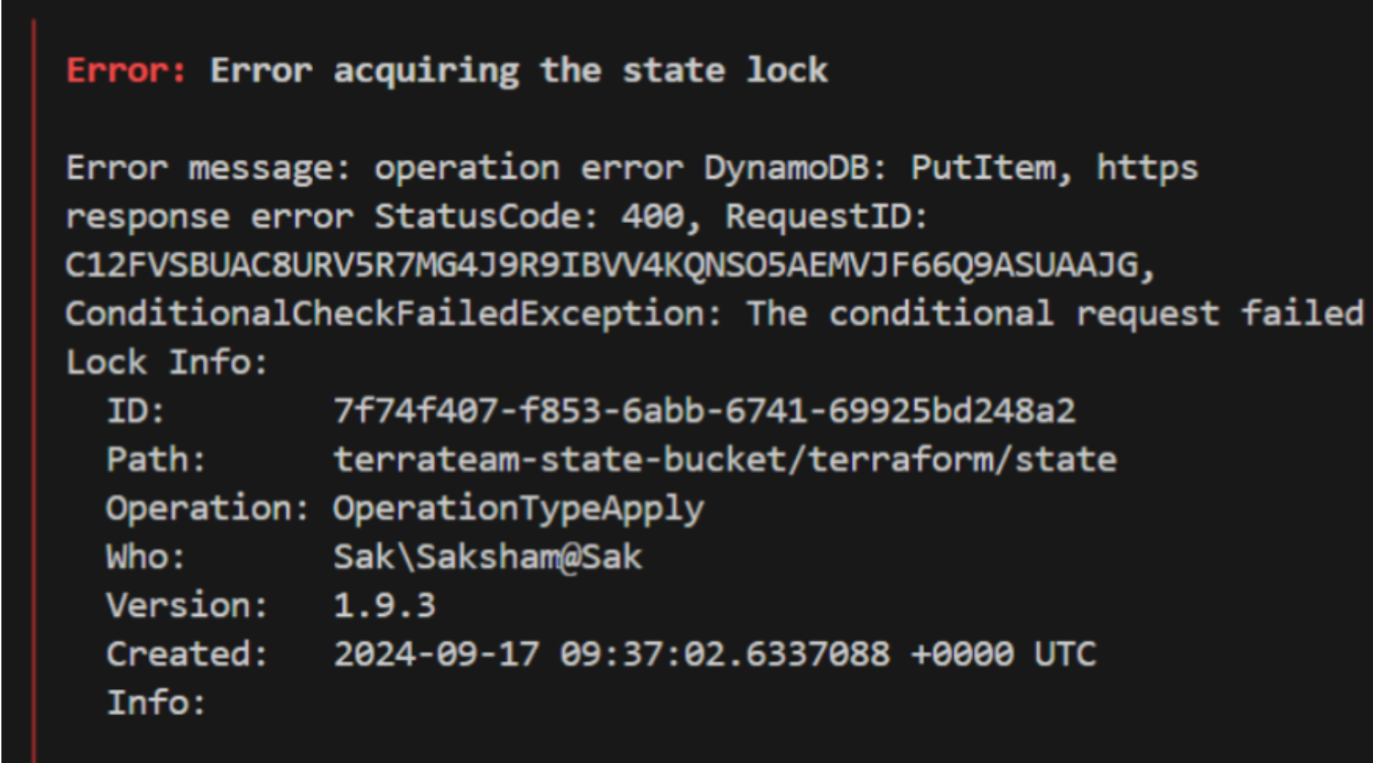
Now, let’s use the output Lock ID with the terraform force-unlock command below:
terraform force-unlock 7f74f407-f853-6abb-6741-69925bd248a2
Scenarios for Using Terraform Force-Unlock
Here, we will look at some of the scenarios where terraform force-unlock is helpful in resolving locked state issues:
- Rollback for Failed Deployments: A deployment can sometimes fail due to a misconfigured resource or network interruption. For example, if a deployment to an AWS RDS instance fails halfway through, the state file may remain locked, preventing further changes. In such cases,
terraform force-unlockis used to release the lock and allow the team to either retry the operation or roll back the failed deployment to a stable state. - Cross-Environment Issues: In projects where multiple environments like development, staging, and production use the same Terraform code, a locked state in one environment can cause problems within other environments. For example, if a deployment in staging fails and leaves the state locked, it will stop any future changes in staging. If staging and production share the same infrastructure, such as a VPC or database, this lock might also block updates in production. In such cases, you can use
terraform force-unlockto unlock the state in staging, allowing you to continue with production changes without waiting to fix the issue in staging. This way, you keep things moving in other environments while dealing with the problem. - Locked State File Due to Failed Terraform Script: A misconfigured Terraform script can fail during an operation and leave the state file locked. For example, if the script includes incorrect resource configurations, such as using unsupported parameters, the
terraform applywill fail. When this happens, the state file remains locked, preventing further changes. By usingterraform force-unlock, you can unlock the state, correct the script, and run it again. - Multiple team-members running Terraform apply at the same time: When working in a team that uses the same remote backend, there can be situations where multiple members try to run
terraform applyat the same time. This means one person’s process will lock the state file, stopping others from making any changes until the lock is released. In such scenarios, you can useterraform force-unlockto release the lock, which will allow others to continue with their changes within the infrastructure.
Usage Example
In this section, let’s explore how Terraform handles state file locking and show how to use the terraform force-unlock in real-world scenarios. We’ll start by working without state locking, then enable state locking using a remote backend, and finally demonstrate how to get terraform plan manually unlock a locked state using the terraform force-unlock command.
Step 1: State Locking with Local Backend
When running multiple infrastructure changes simultaneously on the same machine using the local backend, your state file gets locked and throws a locking error as an output.
Here’s a hands-on example where an aws_s3_bucket is deployed on the AWS cloud provider. First, let’s define the Terraform configuration file:
provider "aws" {
  region = "us-east-1"
}

resource "aws_s3_bucket" "terrateam-bucket-s1" {
  bucket = "s1-tf-bucket"
  acl    = "private"
}
Now, open two terminals on the same local machine and navigate to the directory where the main.tf file is stored. Run the terraform init and terraform apply --auto-approve commands in your terminals (one after the other) to deploy the infrastructure.
Since one of the Terraform deployments locks the state file, you’ll see the state lock error in one of the two terminals:
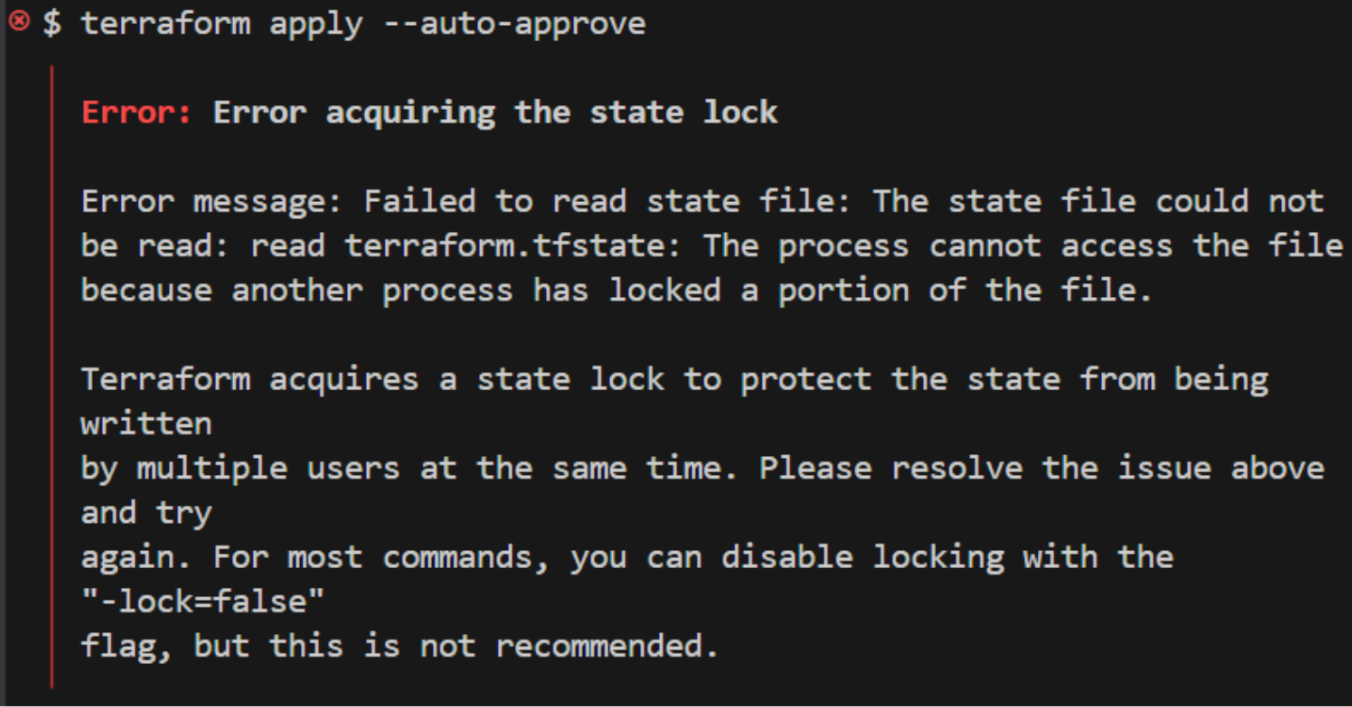
Terraform locks the local state file to the second layer to ensure only one process is making changes at a time. The second terminal can't apply changes because the first one already has a lock on the state file.
While Terraform locks the same state file simultaneously on the same machine, it does not coordinate locks across multiple machines due to a lack of a common state file, meaning that multiple processes on different machines could deploy the infrastructure at the same time.
Step 2: Enabling State Locking with Remote Backend
Now, we’ll set up state locking by using a remote backend, which is an ideal approach when working in a team. We’ll use an S3 bucket for storing the state file and a DynamoDB table for managing the lock. This will make sure that only one Terraform operation can change the state at a time for the complete infrastructure, such as one AWS account.
Define an S3 bucket that will store your Terraform state file by using the AWS CLI. Run the following command:
aws s3api create-bucket \
  --bucket my-terraform-state-bucket \
  --region us-east-1
Once the bucket is created, it will be used to store your Terraform state file, making sure the all state data is stored in the S3 bucket and can be easily accessed by your team.
Now, let's create a DynamoDB table to manage the state lock, ensuring that only one Terraform operation can modify the state lock file at a time by running the command given below:
 aws dynamodb create-table \
    --table-name terraform-lock-table \
    --attribute-definitions AttributeName=LockID,AttributeType=S \
    --key-schema AttributeName=LockID,KeyType=HASH \
    --provisioned-throughput ReadCapacityUnits=5,WriteCapacityUnits=5 \
    --region us-east-1
Now, we will update the main.tf file to use the remote backend to store the state file and define an S3 bucket:
terraform {
  backend "s3" {
    bucket         = "terrateam-state-bucket"
    key            = "terraform/state"
    region         = "us-east-1"
    dynamodb_table = "terraform-lock-table"
  }
}

resource "aws_s3_bucket" "terrateam_bucket_03" {
  bucket = "s03-tf-bucket"
  acl    = "private"
}
Initialize the remote backend by running terraform init. This command will set up the remote backend and enable state locking.
Now, let’s say one of your teammates starts a deployment and pauses it for a few moments for approval, locking the state file. While this is happening, you try to run terraform apply on the same infrastructure but get an error because the state is still locked by your teammate's operation.
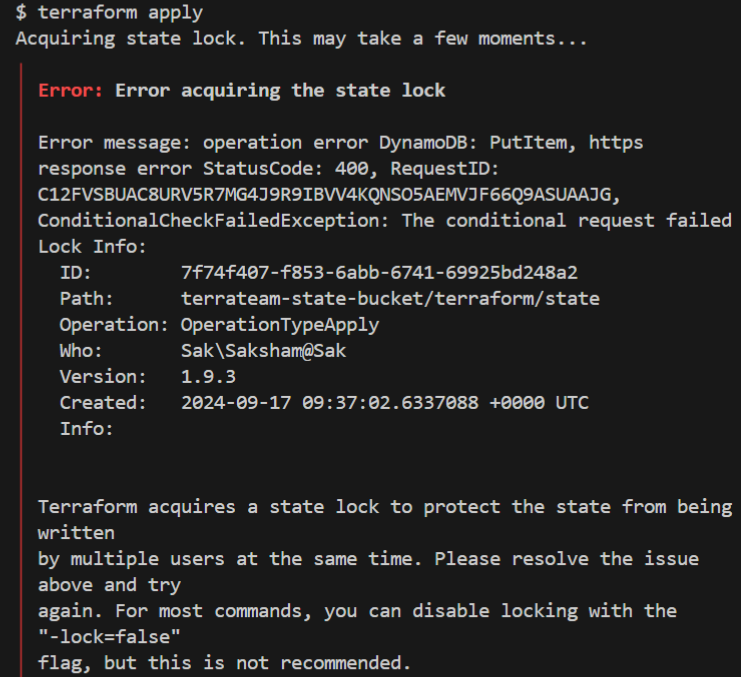
You can manually unlock the state using the terraform force-unlock command with the Lock ID, which we got from the error message:
terraform force-unlock 7f74f407-f853-6abb-6741-69925bd248a2
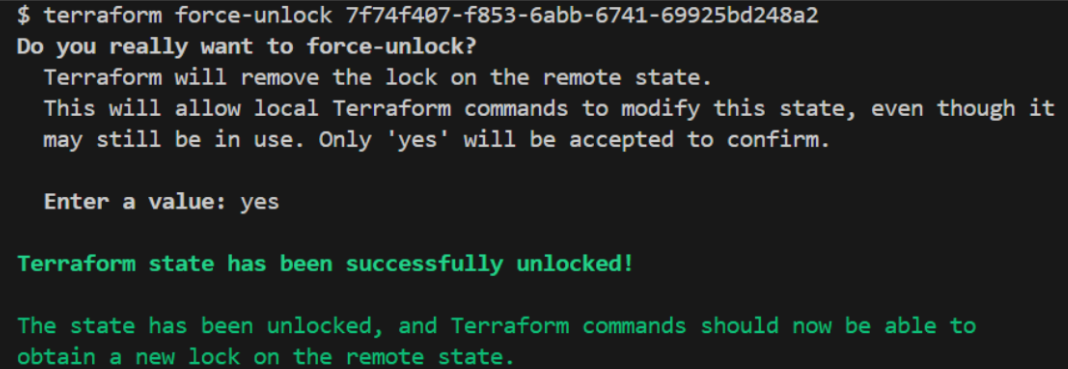
Now, continue to deploy your changes by running terraform apply command.
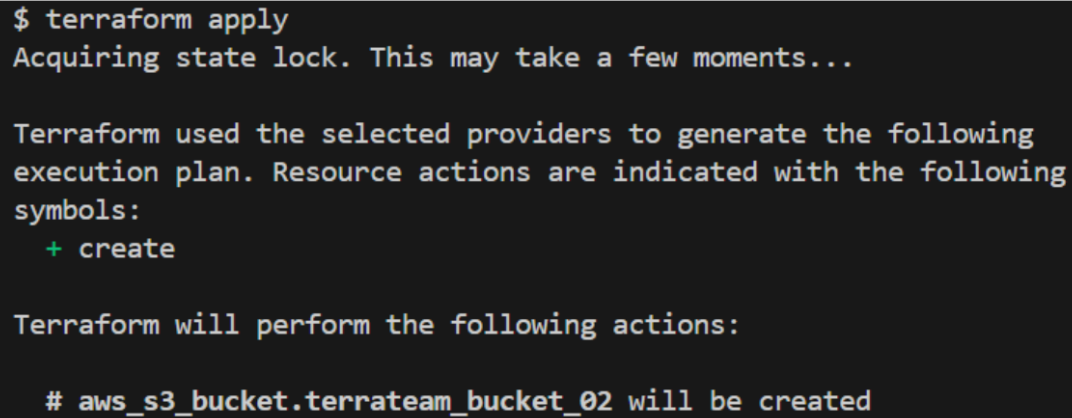
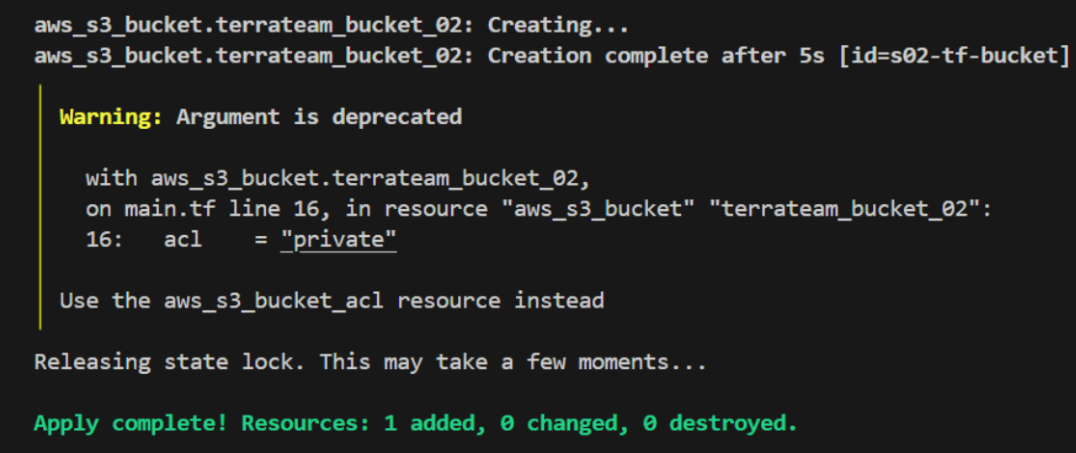
You’ve now seen how Terraform handles state locking with a remote backend, how a locked state can block other operations, and how to use terraform force-unlock to unlock the state and keep it working.
Best Practices for Managing State File Locks
Now, let's take a look at some of the best practices you should follow before running the terraform force-unlock command:
- Backup State Before Unlocking: Back up the state file before using the terraform force-unlock command which is useful in case something goes wrong during the unlock process like, if the state becomes corrupted or the wrong lock is removed, having a backup will make sure that you can restore the state without causing any issues within your infrastructure.
- No Active Terraform Process: Always make sure no one else is running Terraform commands like apply or destroy before you force-unlock the state. If you unlock the state while another process is running, it can lead to incomplete changes. For example, if a teammate is midway through running terraform apply and you unlock the state, it might cause deployment errors or result in resources being incorrectly configured.
- Review the State After Unlocking: After unlocking the state, review it carefully to make sure that everything is in order. This is especially important after a failed operation, where some resources may have been partially created. For example, if an apply operation failed, some resources may not have been fully set up.
A Better Way to Handle State Locking with Terrateam
Terrateam is a tool that helps manage Terraform within GitOps CI/CD workflows. It works seamlessly with GitHub, allowing teams to handle their infrastructure efficiently without wasting time. With Terrateam, you can automate deployments, collaborate effectively with your team, and ensure that infrastructure changes don't cause conflicts. By streamlining your workflow, Terrateam enables faster and more reliable infrastructure management.
Use this guide to set up Terrateam and manage locking at the pull request (PR) level, which helps you avoid conflicts and deployment failures when multiple team members are working on the same infrastructure.
Directory Locking
When you run terrateam apply, Terrateam automatically locks the directories being changed by the pull request, ensuring that other pull requests can't make changes to the same infrastructure. Unlike standard Terraform locking, which only handles one state file, Terrateam offers more control by managing locks at the pull request level. If you haven't set up any custom lock settings in the config.yml file, the current working directory is locked by default.
Simulating a Lock Scenario in Terrateam
Let’s take a look at a scenario where two team members, Alice and Bob, both run terrateam apply on their pull requests respectively. Now, Alice raises a pull request but hasn’t run terrateam apply yet. She’s in the middle of the process, reviewing or waiting for approval. Meanwhile, Bob also raises his pull request and attempts to apply changes using terrateam apply.
Now, Terrateam will detect that the resources are locked by Alice’s pull request and block Bob’s pull request from making changes. Bob will receive a message showing that another pull request already owns the directory and workspace, and he can unlock it using the terrateam unlock 1 command.
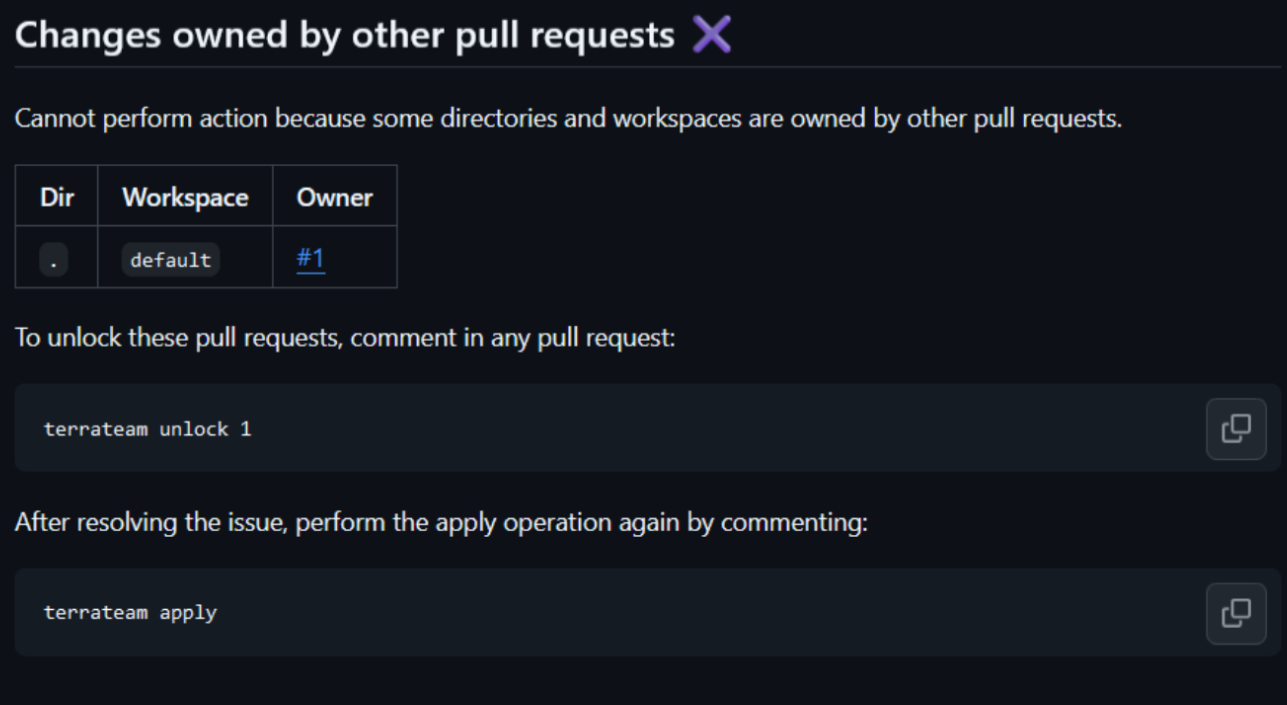
In this case, Bob will need to run terrateam unlock 1 to release the lock held by Alice's pull request. Once the lock is released, Bob can proceed by running terrateam apply again on his pull request, allowing him to make changes to the infrastructure.
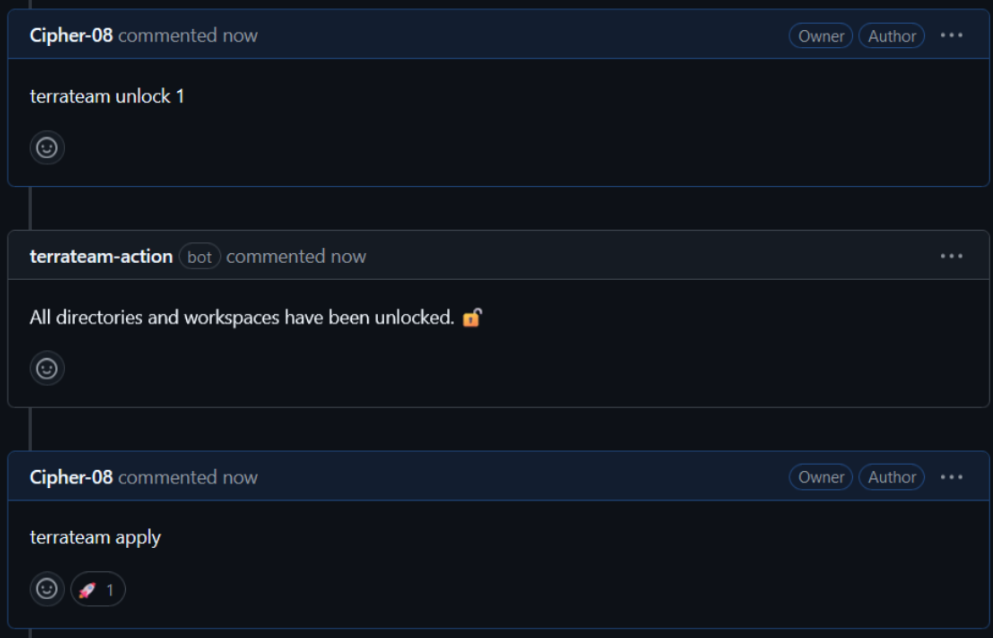
This makes sure that changes are applied safely and prevents conflicts between pull requests, making sure that one pull request doesn’t overwrite the other’s changes.
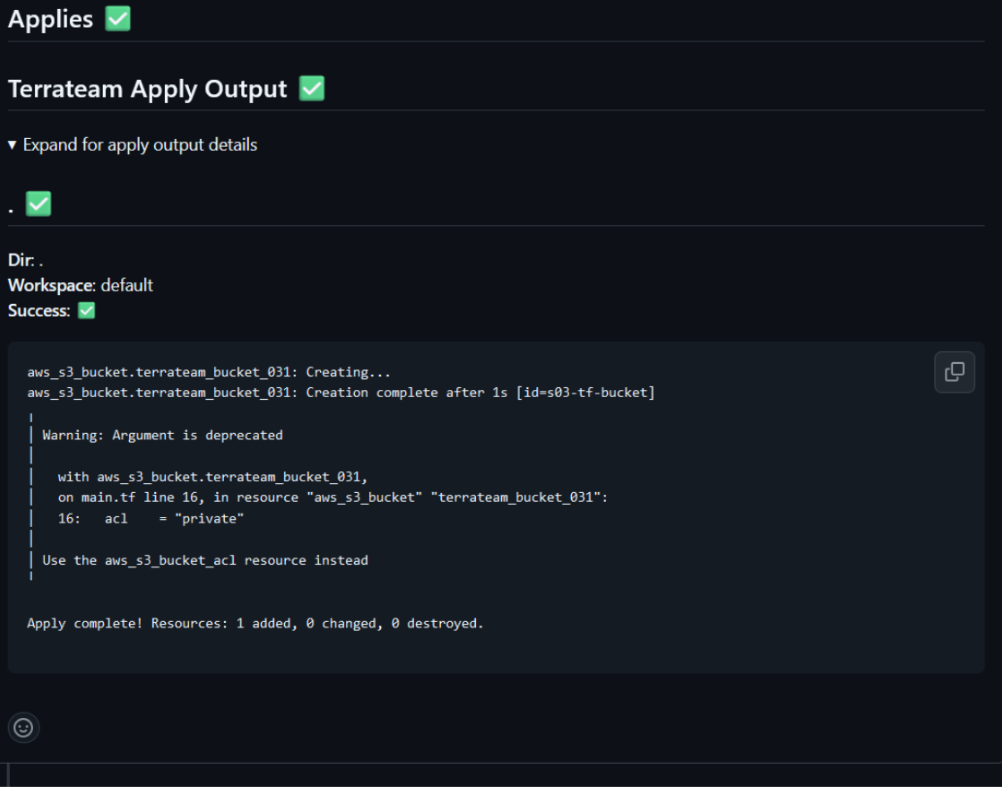
Remember, once Bob has run the terrateam unlock command, his PR (Pull Request) owns the directory. It would block other PR requests until the changes are deployed.
Handling Deployment Failures in Terrateam
Even when the terrateam apply fails, Terrateam holds onto the lock to make sure no conflicting changes are made, protecting the infrastructure from potential issues like misconfiguration or duplicate failures from multiple users.
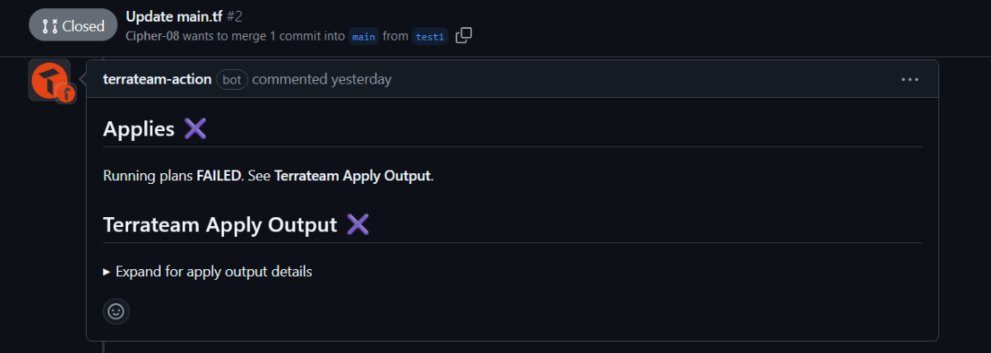
Here, the terrateam apply failed for issue #2. When you raise another PR, issue #2 is still the owner and prevents other pull requests from making changes to the same infrastructure as shown below:
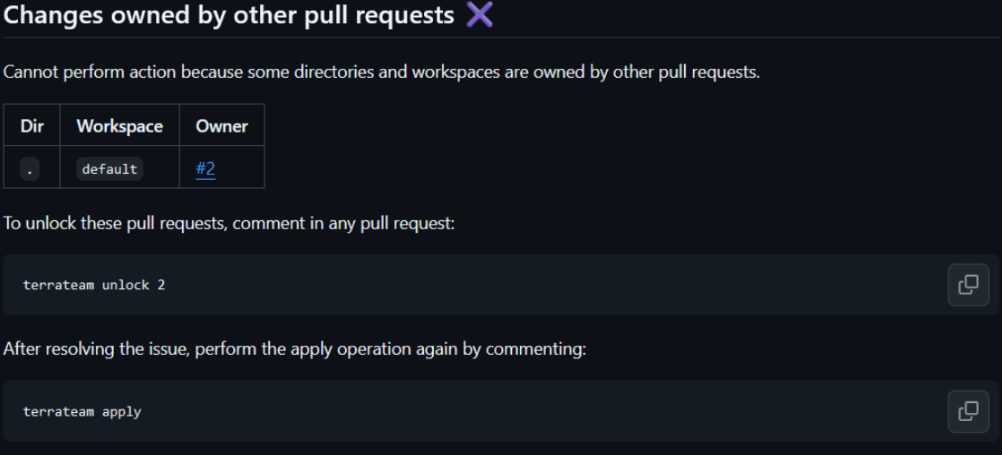
This locking mechanism makes sure that any deployment failures are resolved before further changes can be applied, maintaining infrastructure consistency.
By keeping the lock active even when the apply fails, Terrateam makes sure no other changes happen at the same time, which helps keep the infrastructure stable. This prevents issues that occur if more than one process tries to modify the same resources. Once the deployment is fixed or an unnecessary change, you can run terrateam unlock and terrateam apply.
Flexible Locking Policies
Terrateam allows teams to control when locks should be applied based on their workflow needs. There are four modes to choose from based on your needs:
- strict (default): Terrateam locks the directory when someone runs
terrateam applyor when a change is merged. The lock stays until the operation is completed. This is best for production environments where strict control is needed. - apply: A lock is only applied if
terrateam applyis used. The lock is removed once the change is merged. If the change is merged without usingterrateam apply, no lock is created. This is useful for development environments where changes might happen outside of Terrateam. - merge: A lock is created when the directory is merged, and it stays locked until
terrateam applyis used. This is helpful when pull requests are used for testing and later merged. - none: No lock is applied at any point. This should be used carefully since locking helps keep code and infrastructure changes in sync
To set the lock_policy to "apply" for your current directory, update the .terrateam/config.yml file. Simply add the lock_policy key under the workflows section. This setting will control when locks are applied during the process.
Learn more about Locks and Concurrency.
Summary: Simplified Successful Deployments with Terrateam Lock
Terrateam’s automated locking system with apply makes collaboration and deployments easier by managing locks at the pull request level. It prevents conflicting changes and keeps your infrastructure consistent.
Once Terrateam is integrated into your Github repository, the workflow control is handed over to Terrateam's backend processes.
As a part of these processes, Terrateam performs various checks, such as security, IaC misconfig detection, apply, plan, and plan pre and post-hooks when you raise a PR with plan output, locks, and the cost incurred by the changes.
Terrateam provides an automated, error-free, and simplified way of deploying your changes in a secure, compliant, and efficient manner.